Import
Import recording files, associated metadata or additional data like GPX or CSV into a project.
Recording files (WAV, RAW, FLAC)
There are different ways to import (ultrasonic) audio recordings into a project:
- Use the project wizard
Create a new project and directly import recordings with the help of the wizard. See Import locations and Quick Tutorial.
- Import wizard
To import additional recordings into an existing project, choose File->Import->Recording files. Follow the steps of the wizard as described above to execute import and to apply Tasks.
- DragNDrop
In the Windows Explorer select recording files (WAV, RAW, FLAC) and dragNdrop it into the recordings list. When holding the Shift key the files will be moved, otherwise the will be copied into the project folder. After the import, the recordings will be analysed automatically in the background according to the “Auto-Analyse” setting.
Tip
To copy recordings from one project to another, start a second instance of the BatExplorer application and open the second project. Select the recordings to be moved. DragNDrop the selection to the other recordings list.
Tip
To just quickly open a single recording it is not needed to create a project. Choose File->Open wav… and select a recording file to open. Alternatively dragNdrop a file from the Windows Explorer to the BatExplorer window. It is even possible to open a file via the Windows Explorer function open with or as command line parameter or to set BatExplorer as default application.
Note
If recordings that were analysed with a previous version of the software are imported/opened, a dialog box may be displayed asking if a re-analysis shall be started. Due to algorithm improvements in newer software, it may be appropriate to do so to benefit for further processing. However, keep in mind that re-analysis will affect custom/edited/deleted calls. Assigned species, notes, rating and so on will be preserved.
Import locations
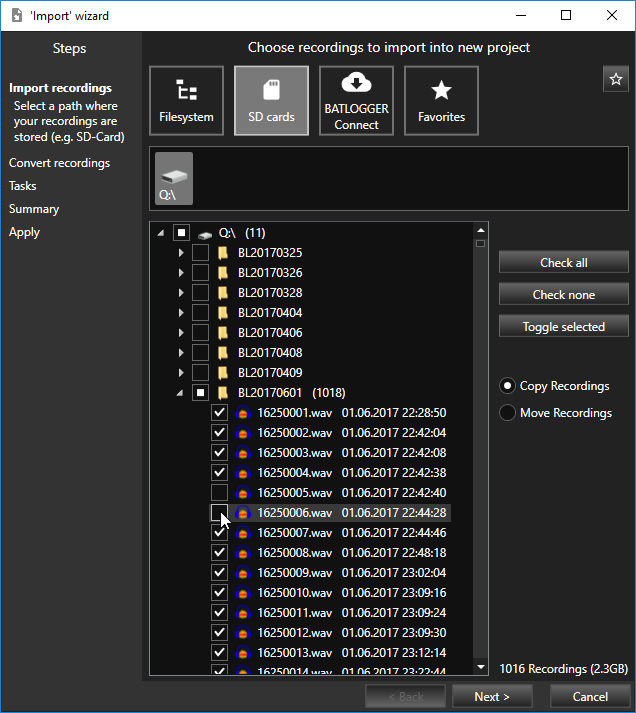
Recordings can be imported from various source locations. Select a location type during the import step of the project and import wizard.
- Filesystem
Browse to a filesystem folder that contains the recordings to import.
- SD cards
Choose an SD card from the list of inserted removable drives.
- BATLOGGER Connect
Enter your BATLOGGER Connect credentials to download recordings directly from the cloud server. Click Connect to list the available recordings.
- Favourites
Filesystem and SD card locations can be saved as favourites for later reuse. Click Add to Fav and enter a name to add a new favourite. Choose a favourite from the list to access a saved location.
The available recordings of the selected location are displayed in a treeview. Check all the recordings you want to import.
It is possible to check whole (sub-)folders or individual files only, depending on your file structure. Use the Check all, Check none and Toggle selected functions to change the selection. Select multiple recordings with Shift or Ctrl and the mouse or the arrow keys, then press the spacebar to toggle selection.
Choose an import method:
- Copy recordings
- Move recordings
BATLOGGER voice comments
Voice audio comment WAV files can be imported in the same way as normal ultrasonic files. Comment files are not analysed and most functions (like classification, …) do not work. However, comments can be played back.
ALLSOUNDER files
Non-Ultrasonic ALLSOUNDER WAV files can be imported in the same way as normal ultrasonic files.
Import non-BATLOGGER recordings [1]
BatExplorer can handle recordings of different sources. Some file formats need additional parameters to be correctly imported. If needed, the recording files will be converted to a full spectrum WAV file during import.
Tip
To import multiple recordings that need conversion parameters, it is best do use the project wizard or import wizard described above. This way the parameters need to be entered only once. When using the DragNDrop or Open audio file method, the parameters are queried for each file separately.
Caution
When importing multiple recording with the project wizard or import wizard, they all must have the same format. Only the first recording will be considered for parameter setup.
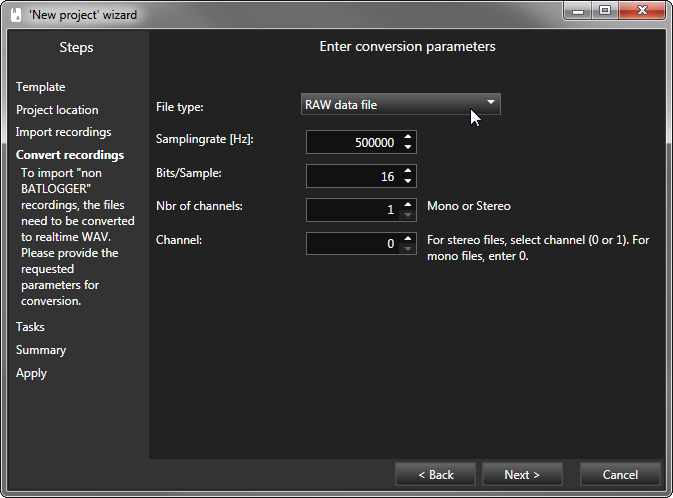
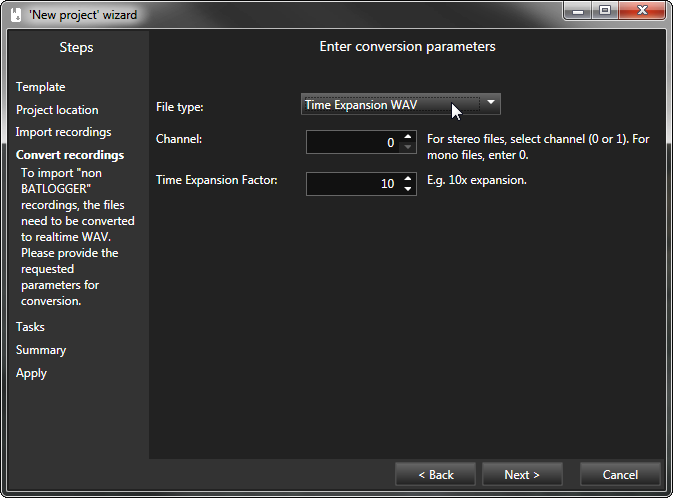
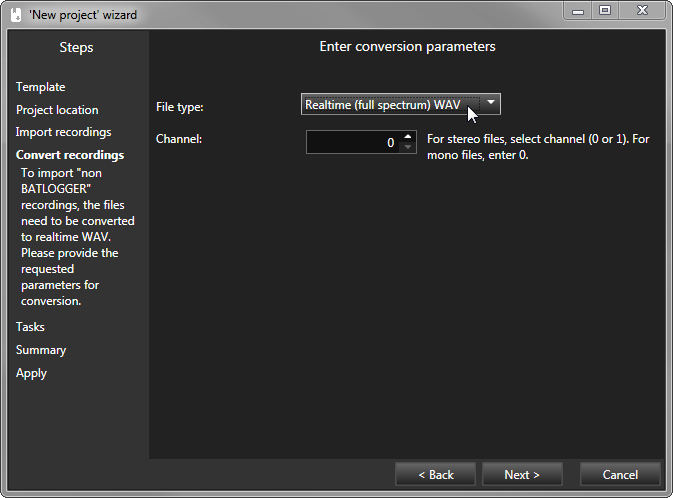
In the wizard, a “convert recordings” step is presented if needed. Select the appropriate file type and enter reading/conversion parameters matching to the import file format.
- Real-time full spectrum PCM WAV, FLAC
Samplingrate >= 100kHz, parameters are read from the file automatically
- PCM RAW data (e.g. Batcorder)
- Enter PCM encoding parameters
Samplingrate [Hz], e.g. 500000
Bits/Sample, e.g. 16
Nbr of channels, e.g. 1
- Time expanded WAV
Time expansion factor (usually 8 or 10) must be entered
- Multi-channel recordings
Choose whether to import all channels or a specific channel only. Also see Multi-channel recordings.
- Meta-data
Optionally the recordings filename can be parsed to read metadata. For example the recording timestamp can be extracted from “20220815_235436.wav”.
Enter a regular expression (Regex) that associates substrings of the filename to metadata fields. Named capture groups are used to assign data to fields. To extract the year part “2022”, the year group <YYYY> is used, <MM> for the month part “08” and so on.
E.g. 20220815_235436.wavparsed with (?<YYYY>d{4})(?<MM>d{2})(?<DD>d{2})_(?<hh>d{2})(?<mm>d{2})(?<ss>d{2})will extract date and time from the filename and use this as recording timestamp.Use the Fields combobox to assemble a Regex and or use provided examples. A preview presents matching fields for the example filename.
Recordings metadata
Device metadata like location, temperature, timestamp and the like are imported automatically if available. BATLOGGER recordings store metadata in an XML file with the same name as the recording. When an audio file (WAV, FLAC) e.g. “14850147.wav” is imported, the XML with the same name “14850147.xml” is imported as well and associated with the recording. If a WAV file contains GUANO-metadata, it is imported as well. Also see Recording metadata.
Metadata of non-BATLOGGER recordings can be extracted from its filenames, see above.
To add metadata from a CSV file, see below.
Multi-channel recordings
Recordings with multiple channel data e.g. stereo, can be imported. Up to 8 channels are supported. However, only one channel is analysed (e.g. call detection etc.) per recording.
Normally, the channel that triggered the recording is analysed and displayed. This behaviour can be overridden by configuring the Project settings accordingly. See also Recording Tab.
Log files
BATREC.log, BATSTAT.csv or other text files can be imported into a project. The can then be easily displayed from within BatExplorer. BATLOGGER log files are imported automatically during the the import of the recording files if are available on the usual paths. To import additional log files, click Import -> Log file… in the file menu or click Add.. on the log files view. See Device log files.
GPX tracks
Import GPX track files to visualize the route travelled for transects or the like. GPX files recorded with a BATLOGGER device are imported automatically during the import of the recording files, if the have the same filenames. To import additional tracks, click Import -> GPX track… in the file menu or Add new GPX track on the map view. See Map.
Tip
To assign location data from GPX to the recordings, use the Assign locations from GPX track function.
CSV data [1]
CSV (Comma Separated Values, Excel) files can be imported and merged into project data.
Caution
This function is currently marked as experimental and expert use only. Please use only with the necessary caution. Backup your data beforehand.
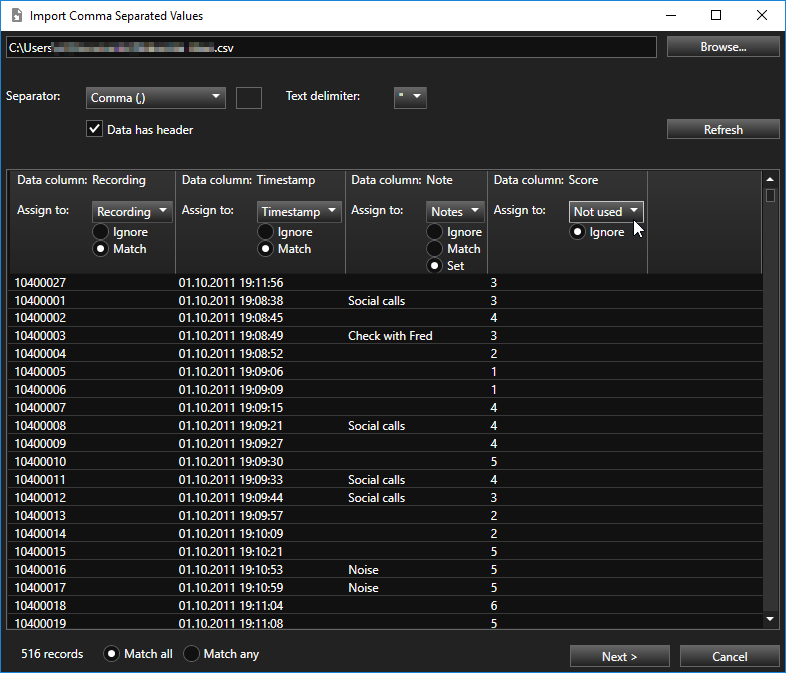
In the file menu, choose Import -> Data from CSV file….
In the import dialog, click Browse… to select the CSV file with the data to import
The file is loaded into the preview table
Adapt the file format settings (separator, delimiter, header) according to the CSV format if needed, click “Refresh” to apply settings
Assign CSV fields (columns) to recording meta fields
If header information is available, the software tries to match corresponding fields automatically
For each CSV column, choose how to handle its data
Select a meta field from the Assign to dropdown list, select “Not used” to ignore the column
Select how to use the data
Ignore: Ignore this CSV column
Match: Use the field data of this CSV column to search recordings that exactly match (read: Find a recording where the field is equal to the search text, usually used for ‘Recording’ or ‘Timestamp’ fields)
Contains: Use the field data of this CSV column to search recordings that partially match (read: Find a recording where the field contains the search text, usually used for ‘Recording’ or ‘Timestamp’ fields)
Set: Write the CSV field data to the recording meta data field for matching recordings (read: Assign the rows data to the recording, e.g. ‘Species’ or ‘Note’)
Choose match behaviour
Match all: All fields configured as Match (if multiple) must match a recording (e.g. ‘Recording’ and ‘Timestamp’ must match)
Match any: Any field configured as Match (if multiple) can match a recording (e.g. either ‘Recording’ or ‘Timestamp’ or both must match)
Click Next to show matching recordings
Click Import to confirm import changes and to start the import process
Note
To match ‘Timestamp’ or ‘Time’ fields, the value must be within ±10s of the recordings timestamp. To match a single recording only, it may be needed to use a further matching field like ‘Recording’ and to use Match all. If the csv data has separate date and time fields, match both fields to ‘Timestamp’ and use Match all.
Note
To match location coordinates, the values must be within ±20m of the recording location coordinates. Use Match all to consider both, latitude and longitude.
Tip
Use the ‘Note append’ field to add multiple CSV columns to the notes. The columns are processed from left to right. Each column adds a new line.
Example
In this example we want to import auto classification data from WSL BatScope into the BatExplorers notes field to add further classification expertise.
Load and analyse the same recordings into both, BatExplorer and BatScope.
In BatScope, export project data with the ‘Generic Exporter’.
In BatExplorers CSV import dialog, open the ‘metadata.csv’ generated by BatScope, change the Text delimiter to none and click refresh.
Assign the ‘Sequence’ column to match the ‘Recording’ field and the ‘Timestamp’ column to match the ‘Timestamp’ field.
Assign the ‘Auto Class’ column(s) to set the ‘Notes append’ field. Optionally, also append the ‘Auto Class Conf’ column(s) the same way.
Assign all other columns to ‘Not used’.
Check Match all so that the recording name and timestamp must match.
Click Next, check the number/list of matching recordings. Click Import to process.
All the matched recordings should now have the auto classification data in the notes field.