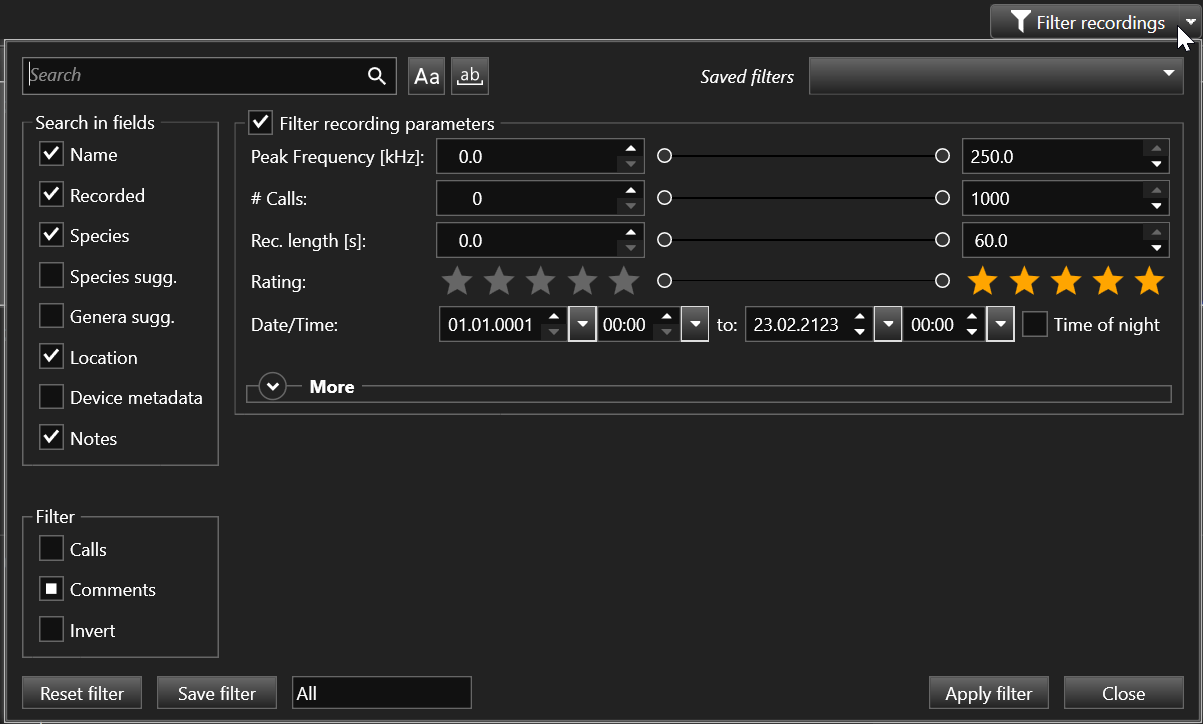
Filter recordings
To display a subset of recordings that meet a specific criteria, a filter can be applied.
Apply a filter
Click the Filter recordings button on the project tab. Enter filter criteria in the popup window and click Apply filter.
Search text
Various text data fields can be searched by entering text in the top left search editbox. Choose the fields to search in from the Search in fields list:
- Name
Recording name e.g. 20001234
- Recorded
Recording date/time
- Species
Species classification(s) text or abbreviation, e.g. Myotis, Ppip
- Species sugg.
First suggested species from the calculated species list
- Genera sugg.
First suggested genus from the calculated genera list
- Location
Recording location from GPS, e.g. street name
- Device metadata
Text in device metadata, e.g. recording profile name. Use the format Caption: Value to search for specific metadata fields, e.g. “SN: 5423” or enter Caption Operand Value (Operand must be ‘<’, ‘>’, ‘=’, ‘<=’, ‘>=’) to compare numeric values, e.g. “Temperature > 5”
Changed in version v2.3.
- Notes
Text in recording notes field
The entered search text can match whole words and/or match case by enabling the respective option.
Note
The recording is selected if any of the selected fields matches the search criteria.
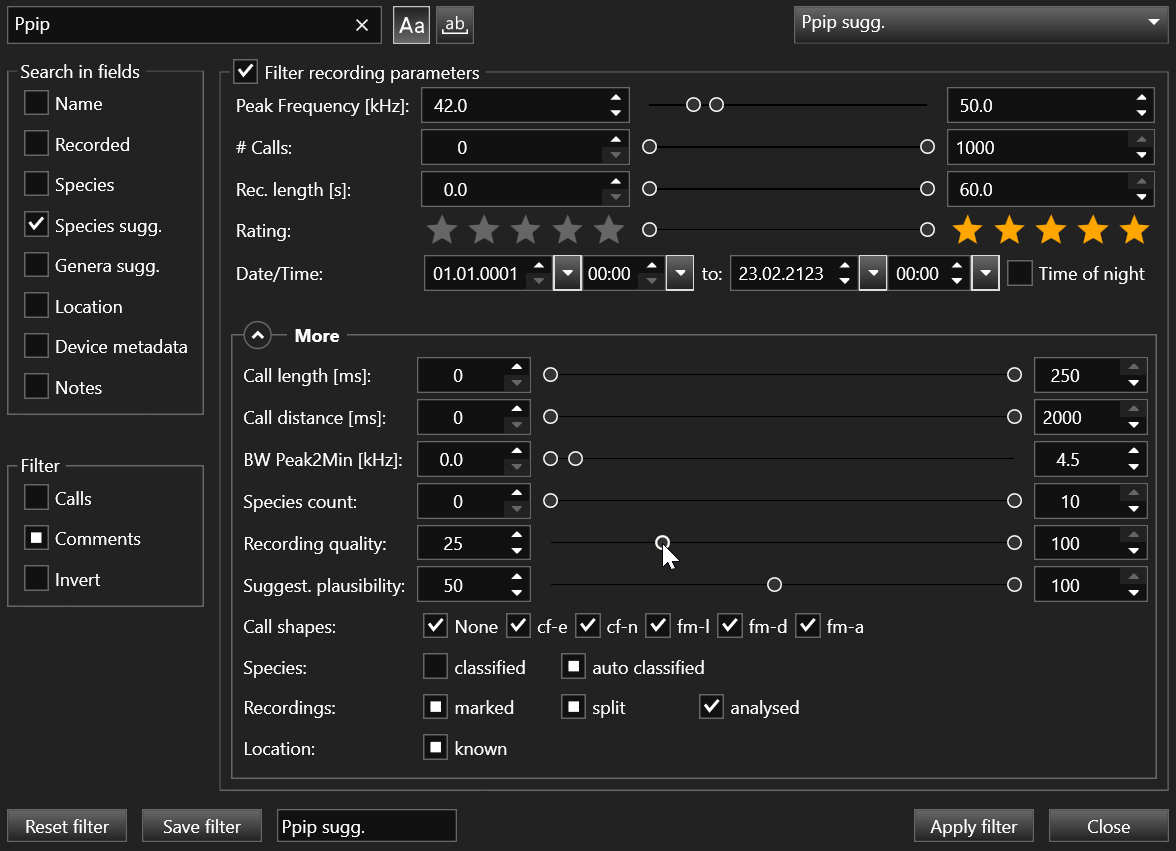
Filter by recording/call parameters
To display only recordings that meet a specific criteria, limits for various recording and call parameters can be setup. For numeric parameters a lower and an upper boundary can be set by entering the values directly or by clicking the trackbar. Enumeration values can be included or excluded by enabling or disabling the checkboxes. Status values like “Species classified” or “Location known” can be set in three states ☑ true, ☐ false or ▣ don’t care.
Note
The recording is selected if all the parameters meet the criteria (AND operator).
Tip
To quickly filter frequency and time parameters, you can select a rectangle area in the Activity, Frequencies and Frequencies/Time statistics view.
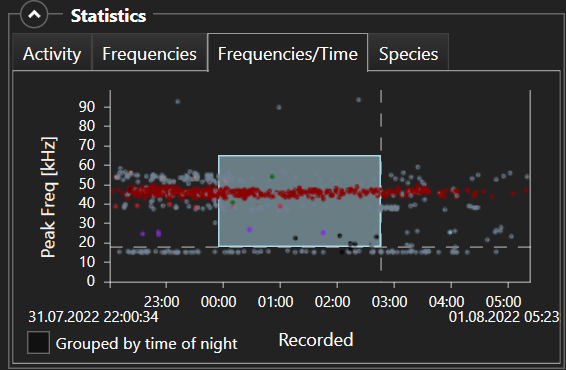
When “Grouped by time of night”, recordings will also be filtered by “time of night” ignoring the date part, e.g. show recordings made between 20:00 and 21:00 on multiple days.
Tip
To filter species, only show recordings of a certain species, double-click a species row in the Species statistics view. Alternatively right-click to show the context menu and select Show.
Advanced filter techniques
- Mark
A recording can be “marked” for later filtering or manual processing. Use the checkbox (CTRL+M) on the recordings list or use the context menu functions Assign->Mark/Unmark-> Mark, Unmark or Toggle mark to mark/unmark multiple selected recordings.
Use marking to combine multiple filters (OR function) e.g. show two species. To do that
Clear all recording marks with: CTRL + A, CTRL + ALT + M
Filter first criteria (e.g. Species = Ppip)
Mark filtered recordings with: CTRL + A, CTRL + M
Filter second criteria (e.g. Species = Ppyg)
Mark filtered recordings with: CTRL + A, CTRL + M
Filter marked recordings
Use marking to restrict to multiple filters (AND function) e.g. show species at specific location. To do that
Clear all recording marks with: CTRL + A, CTRL + ALT + M
Filter first criteria (e.g. Species = Ppip)
Mark filtered recordings with: CTRL + A, CTRL + M
Filter additional criteria (e.g. Location = MyVillage) and check “marked”
This technique can also be applied with the help of multiple successive Tasks using the “Mark” action.
- Calls
By default, the filter works with the recordings mean call values. To search in all calls, check Calls in the Filter groupbox. When checked, all the individual calls of a recording are filtered instead of the mean values. Recordings which contain at least one matching call are displayed. Use the “# Calls” filter range to find recordings with a certain number of matching calls, e.g. minimum 3 calls that match.
Call criteria used for Calls filter:
Peak Frequency
Call Length
Call Type
Species suggestion
Sugg. plausibility
- Comments
Choose to include or exclude (BATLOGGER M2) voice comment recordings when filtering.
- Invert
The whole filter criteria can be inverted by checking the Invert checkbox.
Reset filter

To reset filter and display all recordings, click the X button left of the ‘Filter recordings’ button. Alternatively click Apply filter and then Reset filter.
To restore the last used filter, choose View->Restore filter or click the Restore filter button left of the ‘Filter recordings’ button.
Save/Restore filter
The current filter settings can be saved for later reuse. To save a filter, click the Save filter button. When prompted, enter a filter name and click OK to save.
To restore a saved filter, click on the Saved filters dropdown list and choose a filter.
To delete a saved filter , click on the Saved filters dropdown list and then click the “trash bin” button to delete.
Tip
Saved filters are a part of the application options and can be exported/imported accordingly.