Record bat calls
Recording session
In a recording session ultrasonic audio recordings and other data are collected and stored on the SD card. Displayed statistics, lists and diagrams refer to the current session. GPX tracks are created per session if applicable. Start and stop of a session is logged. Some functions like Device settings or Tools are not available during a session.
To exit the recording session, press the  key and confirm with
  .
.
The sessions recording mode and available features depend on the recording profile selected.
The device can be operated in different modes:
Automatic recording mode
 In automatic recording mode the signal from the microphone is constantly monitored and the recording starts
automatically, when a triggering event is registered (detected ultrasound signal, e.g. bat call). The
duration of such recordings depends on the presence of the triggering criteria. The recording duration includes
a pre trigger part (0.5 seconds before the first) and a post trigger part (1 second after the last trigger
event).
In automatic recording mode the signal from the microphone is constantly monitored and the recording starts
automatically, when a triggering event is registered (detected ultrasound signal, e.g. bat call). The
duration of such recordings depends on the presence of the triggering criteria. The recording duration includes
a pre trigger part (0.5 seconds before the first) and a post trigger part (1 second after the last trigger
event).
Manual recording mode
 In manual recording mode a recording has to be started and stopped manually by pressing a key.
Trigger events are displayed only and do not initiate a recording.
This allows to record certain events only, e.g. record interesting species only.
In manual recording mode a recording has to be started and stopped manually by pressing a key.
Trigger events are displayed only and do not initiate a recording.
This allows to record certain events only, e.g. record interesting species only.
A manual recording can also be initiated in automatic recording mode, e.g. to record events that do not trigger automatically (social calls, …). Recordings are stopped after a max. recording time (10 seconds), even if trigger criteria are still fulfilled.
Paused mode
In paused mode triggering and monitoring is disabled temporarily without leaving the session. This allows to exclude a part of the route or to prevent repeated recordings of the same animal for example. To pause, press the action key associated to the pause function (see Actions) or use the Actions screen.
Interval recording mode
Recordings can be made in time intervals to reduce the amount of data required to analyse. With statistic methods this data can be extrapolated as if it was run nonstop. The device will switch between active and inactive time intervals. See Interval settings.
Recording status
The current recording status is displayed on top of the screen.
The level indicator on the right shows the present signal level.
In case of a trigger event, the trigger frequency and signal level is displayed. While a recording is being made, its filename and duration is displayed. If live monitoring is enabled, the current status is displayed (e.g. HD: 36 kHz or FD: 1/10 depending on the method).
Recording screens
Depending on the recording profile currently in use, different screens are displayed. Use the  keys to switch screens.
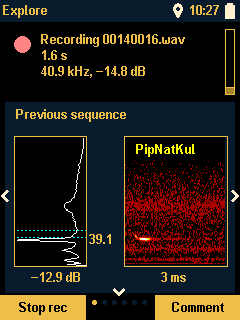
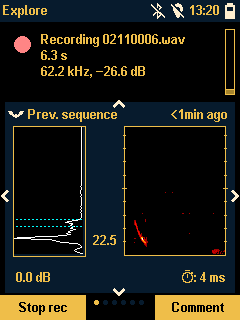
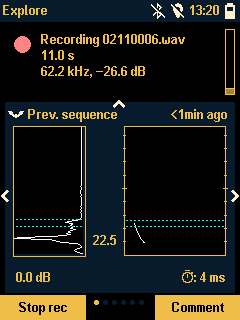
Previous sequence screen
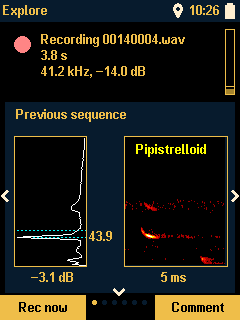
Displays information about the previous recording and allows a first quick analysis.
Use the  keys to switch the display mode.
Press the key to enter quick review and “freeze” the recording displayed, to allow first analysis without going to the review screen.
Recordings will still be made in the background, but the screen will not be updated with new recording data.
Press the keys to change displayed calls.
Press the or key to leave quick review and display latest recording data.
Display modes
- Stitched calls:
A spectrogram of stitched bat calls is rendered. The “nicest call” with preceding and subsequent calls are displayed, if available.
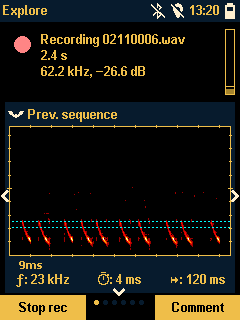
The call cutouts are indicated by x-axis ticks. The first tick mark indicates the cutout length in ms. The average call parameters (peak frequency ƒ: 45kHz, call length ⏱: 11 ms, call distance ↦: 85 ms) are shown.
- Nice call spectrogram:
A spectrum graph and a spectrogram of the “nicest call” is rendered. Detected bat call parameters (peak frequency 45kHz, call length ⏱: 11 ms, peak level: -3.1 dB) are shown. The spectrum displays the maximum frequency levels of the shown spectrogram.
- Nice call shape:
The detected call shape of the “nicest call” is rendered to allow judgment of the measured call parameters and auto classification.
The y-axis tick marks indicate 20kHz frequency steps.
Automatic classification (Auto ID)
Depending on the current (GPS) location and recording quality, an automatic call classification is displayed for the call shown in the single call spectrogram.
Warning
Automated identification of species depends on many factors: recording quality, bat distance, noise, species, settings, … and may therefore be inaccurate. Results must always be critically reviewed before selection. Elekon AG may not be held responsible for wrong identification.
Classification is done in two steps:
Classify group
Match a species according to the detected group
The classification result, if any, is also added to tags.
Currently, 32 European bat species in 7 groups can be identified:
Table of European bat species...
Label |
Group |
Species |
Common name |
|---|---|---|---|
“Bbar” |
“Barbastelle” |
Barbastella barbastellus |
Western barbastelle |
“Enil” |
“Nyctaloid” |
Eptesicus nilssonii |
Northern bat |
“Eser” |
“Nyctaloid” |
Eptesicus serotinus |
Serotine bat |
“Hsav” |
“Pipistrelloid” |
Hypsugo savii |
Savi’s pipistrelle |
“Misch” |
“Pipistrelloid” |
Miniopterus schreibersii |
Common bent-wing bat |
“Malc” |
“Myotis” |
Myotis alcathoe |
Alcathoe bat |
“Mbec” |
“Myotis” |
Myotis bechsteinii |
Bechstein’s bat |
“Mbly” |
“Myotis” |
Myotis blythii |
Lesser mouse-eared bat |
“Mbran” |
“Myotis” |
Myotis brandtii |
Brandt’s bat |
“Mcap” |
“Myotis” |
Myotis capaccinii |
Long-fingered bat |
“Mdas” |
“Myotis” |
Myotis dasycneme |
Pond bat |
“Mdau” |
“Myotis” |
Myotis daubentonii |
Daubenton’s bat |
“Mema” |
“Myotis” |
Myotis emarginatus |
Geoffroy’s bat |
“Mmyo” |
“Myotis” |
Myotis myotis |
Greater mouse-eared bat |
“Mmys” |
“Myotis” |
Myotis mystacinus |
Whiskered bat |
“Mnat” |
“Myotis” |
Myotis nattereri |
Natterer’s bat |
“Nlas” |
“Nyctaloid” |
Nyctalus lasiopterus |
Greater noctule bat |
“Nlei” |
“Nyctaloid” |
Nyctalus leisleri |
Lesser noctule bat |
“Nnoc” |
“Nyctaloid” |
Nyctalus noctula |
Common noctule bat |
“Pkuh” |
“PipiNatKul” |
Pipistrellus kuhlii |
Kuhl’s pipistrelle |
“Pnat” |
“PipiNatKul” |
Pipistrellus nathusii |
Nathusius’s pipistrelle |
“Ppip” |
“Pipistrelloid” |
Pipistrellus pipistrellus |
Common pipistrelle |
“Ppyg” |
“Pipistrelloid” |
Pipistrellus pygmaeus |
Soprano pipistrelle |
“Paur” |
“LongEared” |
Plecotus auritus |
Brown long-eared bat |
“Paus” |
“LongEared” |
Plecotus austriacus |
Grey long-eared bat |
“Pkol” |
“LongEared” |
Plecotus kolombatovici |
Kolombatovic’s long-eared bat |
“Pmac” |
“LongEared” |
Plecotus macrobullaris |
Alpine long-eared bat |
“Reur” |
“Rhinolophus” |
Rhinolophus euryale |
Mediterranean horseshoe bat |
“Rfer” |
“Rhinolophus” |
Rhinolophus ferrumequinum |
Greater horseshoe bat |
“Rhip” |
“Rhinolophus” |
Rhinolophus hipposideros |
Lesser horseshoe bat |
“Tten” |
– |
Tadarida teniotis |
European free-tailed bat |
“Vmur” |
“Nyctaloid” |
Vespertilio murinus |
Parti-coloured bat |
Recent recordings screen
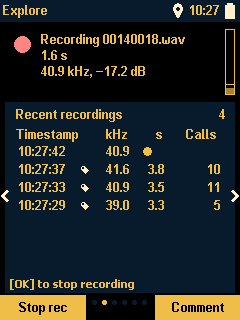
A list of the latest 20 recordings with some metadata is displayed.
Press the key to start/stop a manual recording.
Use the keys to switch to review mode.
In review mode use the ![]() keys to select a recording or an action.
Select the filename and press the key to open the review screen.
Select the Playback icon and press the key to start playback.
Select the Trashcan icon and press the key to delete the recording.
Press the key to exit review mode.
keys to select a recording or an action.
Select the filename and press the key to open the review screen.
Select the Playback icon and press the key to start playback.
Select the Trashcan icon and press the key to delete the recording.
Press the key to exit review mode.
The used sd card space is indicated in the top left icon.
Map screen

Displays the route, waypoints and track if available. See Transect for further information about map data.
Waypoints are displayed in different colours according to its state:
Yellow: Waypoint not reached yet
Green: Waypoint reached, wait for dwell time to pass
Blue: Waypoint done
Use the keys to select waypoint or zoom menu.
In waypoint menu, press the key to switch to an other waypoint. This can be used to skip a waypoint if needed.
In zoom menu, press the key to change zoom level.
Press the key to exit edit mode.
Environment screen
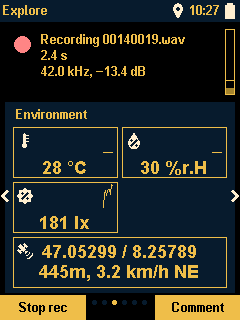
Displays present and a graph of the most recent values from the various device sensors.
Temperature: in °C
Humidity: %r.H.
Brightness: lux
GNSS: Coordinates, height above see level and velocity
Actions screen
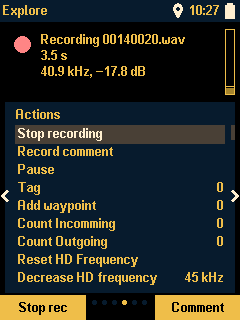
Various useful actions can be performed during a recording session.
Use the keys to select an action. Press the key to execute the selected action.
Tip
Actions can be assigned to the  /
/ keys to directly perform it at any time. See Actions.
Actions
- Pause/Resume:
Pause/resume the recording session. Triggering is inactive, no recordings will be started.
- Record now:
Starts/stops a manual recording.
- Record comment:
Starts/stops a voice comment.
- Tag:
Add a tag to the current recording. A tag can be added to the previous recording until a new recording is started.
- Reset HD frequency:
In heterodyne live monitoring mode, resets the frequency back to the custom value.
- Decrease HD frequency:
Decreases heterodyne frequency by 1kHz and switches to manual HD mode.
- Increase HD frequency:
Increases heterodyne frequency by 1kHz and switches to manual HD mode.
- Torch:
Turn on torch.
- Add waypoint:
Adds the current GPS location to a waypoints GPX file that can be used for transects.
- Count incoming:
Count an incoming event.
- Count outgoing:
Count an outgoing event.
- Prevent recordings:
Prevent recordings from beeing stored on the sd card. Trigger is still active and detected activity will be indicated. Live monitoring keeps active. Allows quick toggeling of the “auto recording” profile setting.
Monitoring screen
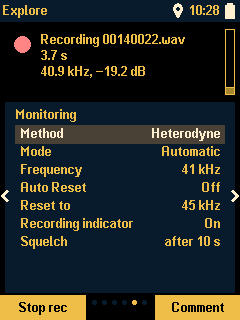
Switch live monitoring methods and parameters.
Method Off
Live monitoring is disabled
Method Heterodyne (Mixer)
Use heterodyne transformation to make ultrasonic audible.
- Mode:
- Automatic: Heterodyne frequency is automatically set to trigger frequency.Manual: Use a custom heterodyne frequency (hear bats +/-5kHz around this frequency, the other freqencies are dampend but not completely off).
- Cur. Frequency:
- In automatic mode: Displays the current heterodyne frequency (trigger frequency). Press to enter a custom heterodyne frequency and switch to manual mode.In manual mode: Press to change custom heterodyne frequency.
- Auto Reset:
- On: When no trigger is detected anymore, heterodyne frequency is automatically reset back to the setup custom frequency.Off: When no trigger is detected anymore, current heterodyne frequency (from last trigger) stays.
- Reset to:
Press
to edit custom auto reset frequency.- Reset HD frequency:
Press
to manually reset back to custom heterodyne frequency.
Method Divider
The input signal frequencies are divided by a divider value to make ultrasonic audible.
- Divider:
Press
to enter a divider value 4..20.
Method Mixed
Use headphones to hear Heterodyne and Divider in parallel. One on the left, one on the right ear.
General parameters
- Recording indicator:
If enabled, an audible indicator sound is played on the start of a recording.
- Squelch:
Reduce audible noise when no trigger is detected. Enter a time in seconds after which squelch is active or 0 disable squelch.
Counter screen
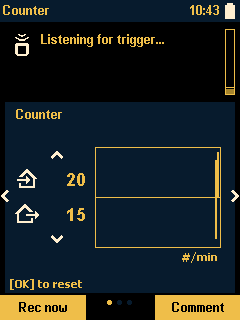
Display the counter values of outgoing and incoming bats and a bar graph of the last hour. See Counter for further information about counting bats.
Press the ![]() key to count an incoming event.
key to count an incoming event.
Press the ![]() key to count an outgoing event.
key to count an outgoing event.
Press the key to reset the counters.
Schedule screen
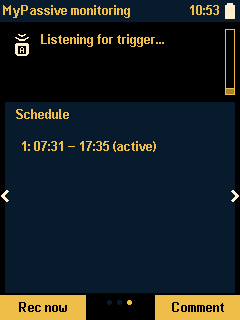
Displays schedule times. See Passive for further information about unattended recording.
Voice comments
Voice comments can be recorded at any time in a recording session (except in some special edit modes or passive profile, see below).
Press the action key associated to the comment function (see Actions) or press the key when in Comments screen.
Tag a recording
A recording can be amended with so called tags to quickly add helpful information for later analysis e.g. observations like “flew near treetop”, “foraging” or whatever you find important. Multiple tags can be assigned to a recording. The assignment can be made either during recording or shortly afterwards, before the next recording starts. To add a tag late on, use the Tags screen in Review recordings. A list of tags can be defined prior a recording session in order to be able to just quickly choose from a list when in action. Setup the list in Actions. But new tags can also be entered during the recording session directly.
To assign a tag to a recording, press the action key associated to the tag function or use the Actions screen.
Tags are stored in the metadata XML file.
Comments screen
A list of the latest 20 Voice comments with some metadata is displayed.
Press the key to start/stop recording a comment.
Use the keys to switch to review mode.
In review mode use the
keys to switch to review mode.
In review mode use the  keys to select a recording or an action.
Select the filename and press the
keys to select a recording or an action.
Select the filename and press the  key to open the review screen.
Select the Playback icon and press the
key to open the review screen.
Select the Playback icon and press the  key to start playback.
Select the Trashcan icon and press the
key to start playback.
Select the Trashcan icon and press the  key to delete the recording.
Press the
key to delete the recording.
Press the  key to exit review mode.