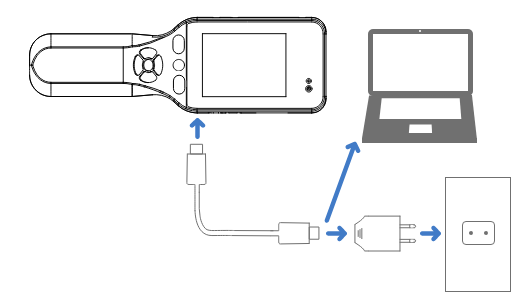
Battery Charging
Warning
Only use power supplies that have a CE certification and provide a minimum of 500mA/5V.
Upon delivery, the battery of the device may not be fully charged. Please charge the battery before first use.
Plug in the provided USB cable into the device USB-C port.
Plug the USB cable into a USB power supply (minimum 500mA/5V) or into a computers USB port. Use the USB-C to USB-A adapter if necessary.
Plug the power supply into a power outlet.
Charging begins when the charging status is displayed on the device screen.
Charging is complete when the charging status displays “Fully charged”. The charging time can take several hours, depending on the state of charge, the power supply used and the cable.
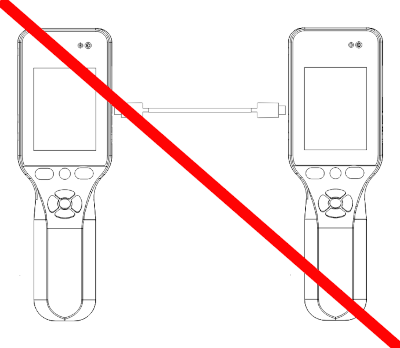
Warning
Don’t connect two BATLOGGER M2 with an USB cable.
Tip
The device can also be charged/operated with a power bank to extend the operation time out in the field.
Tip
To perform a quick charge, use the supplied USB-C cable together with a fast-charging USB-C power supply.
Power-On
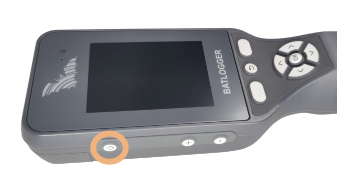
Press the
 key for about 3 seconds to turn on the device.
The device starts and initializes itself.
Power-Off
Press the
key for about 3 seconds to turn off the device.If a recording session is active, confirm the shutdown by pressing
 .
.
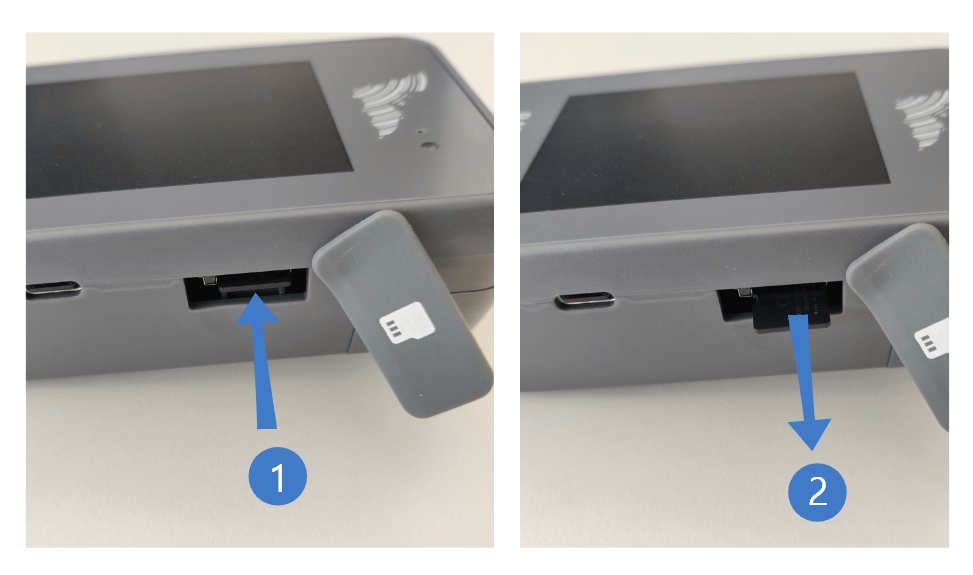
Inserting/Removing SD card
Warning
Turn off the device before removing the SD card. Otherwise the data may become corrupted and/or the SD card may be damaged.
Make sure that the device is turned off.
Carefully lift the SD card slot cover and turn it to the side a little.
Insert the SD card all the way into the SD card slot with the card label facing to the bottom of the device.
Push the SD card in, to remove it.
Tip
The data on the SD card can also be accessed via USB connection in order not to have to remove the card.
Tip
The device can be operated without SD card but has limited functionality then. E.g. it is possible to use it as simple bat detector without recording capabilities in this mode.
Replace/change the microphone
Warning
Turn the unit off for commissioning/changing the microphone: Make sure that the unit is switched off before connecting a microphone or changing the microphone.
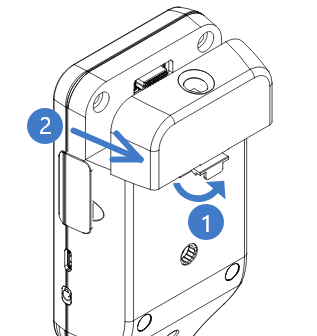
Make sure that the device is turned off.
Pull the microphone enclosure up (away from the display) while pulling the latch.
To insert it again, align it to the guides and press it down until the latch clicks in.
Using the M2 Stereo Microphone
To use the M2 Stereo Microphone (available separately) make sure that you have the latest Firmware installed. See here on how to update firmware.
remove the M2 mono microphone as shown above
insert the M2 stereo microphone
plug in your headphones (you can’t hear stereo without headphones)
use your M2 as you used it with the M2 mono microphone
Setup regional settings
Upon the first start of the device, a few local preferences must be configured before use.
Use the  keys to change to the desired value.
Press the key to apply the setting or press
keys to change to the desired value.
Press the key to apply the setting or press  to go back one step.
To setup further settings like clock, theme, LCD brightness, etc.,
use the instructions provided in Device settings.
to go back one step.
To setup further settings like clock, theme, LCD brightness, etc.,
use the instructions provided in Device settings.